INSTALLATION INSTRUCTIONS
Home / SNOWMOBILE STUDS / INSTALLATION INSTRUCTIONS
INSTALLATION RECOMMENDATIONS & GUIDE
A GUIDE TO HELP YOU SET UP YOUR SLED TO HANDLE THE WAY YOU WANT IT TO HANDLE.


MAKE YOUR SLED PERFORM SO THAT IT’S COMFORTABLE FOR YOUR RIDING STYLE:
- Too many studs will cause the stud to push and you can’t turn. This is the worst situation.
- Too few studs will leave your back end “loose” and it’ll slide out from under you, causing you to lose control.
- It’s better to start out with fewer studs and add more if you need them.
- WHEN INSTALLING OR RE-STUDDING A TRACK, ALWAYS TEST THE TRACTION IN SAFE CONDITIONS TO BE SURE THAT IT’S HANDLING THE WAY YOU WANT IT TO HANDLE.
FACTORS TO DETERMINE HOW MANY STUDS TO INSTALL:
- Size/horsepower of the motor
- Length of carbide runners on the skis
- Your riding style, habits and where you ride
- Taking all these factors into consideration, here are some simple guidelines for how many studs to install initially – then TEST DRIVE your sled to see if that works for you
- Trail/touring – 2 studs per lug. (we don’t recommend less than 2 except for very low-powered sleds or for kids.)
- Performance – 2-3 per lug. If you decide on 3 per lug, it’s easier to install and keep the pattern balanced if you go 2-4-2. This will give you the same number of studs, but will keep the pattern balanced.
- Expert/extreme – for this style of riding in extreme conditions, studding is very important. If you install less than 3 studs per lug, you risk damage to your track due to the high forces your riding is putting on the track. We recommend that you consider 4 studs per lug to spread out the forces on the track and also to provide the traction that your style of riding demands.
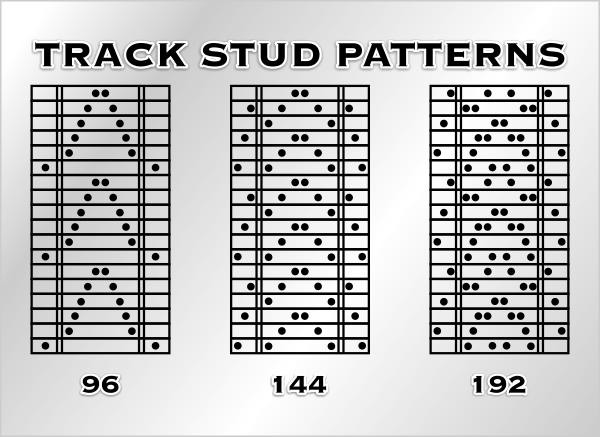
Shown below are basic studding patterns for 2,3 or 4 studs per lug. These will work well in most applications. The most important thing to remember is to maintain the arrow-head or wedge shape when drilling and installing the studs so that you keep the traction balanced and the sled won’t push to one side or the other.
- Take the time to lay out your pattern so that you get it right the first time
- Avoid repeating scratch lines
- Use a track cutter – TK-11 – to cut a neat, clean hole in the track.
- Do not put too many studs in the outside belts as that will make your sled tippy
- Check with your dealer and/or owner’s manual for any special installation instructions
- Check with your dealer to see if tunnel protectors have been factory-installed. If not, have your dealer install them. DO NOT install traction on a sled that doesn’t have tunnel protectors.


